Introduction
Leaking faucets are one of the most common household plumbing issues. A faucet that constantly drips or leaks around the handle, base, or connections may seem like a minor inconvenience, but continuous water loss can increase water bills and contribute to mineral buildup, corrosion, and damage to nearby cabinets or countertops.
Knowing how to repair a leaking faucet can help homeowners address simple problems before they become more expensive plumbing repairs. Depending on the faucet type and location of the leak, the solution may involve cleaning buildup, tightening a loose component, or replacing a worn washer, O-ring, cartridge, or seal.
This guide explains how to identify the source of a faucet leak, determine which component may be causing the problem, and safely carry out basic repairs. It also covers situations where professional plumbing assistance may be the better option.
Common Causes of a Leaking Faucet

A leaking faucet can result from normal wear, loose components, corrosion, or mineral buildup. Identifying the likely cause can help determine whether a simple component replacement is enough or whether the entire faucet may need attention.
2.1 Worn-Out Washer
A washer helps create a seal that prevents water from escaping when the faucet is turned off. In faucets that use traditional compression-style mechanisms, repeated use can cause the washer to become hardened, worn, cracked, or deformed.
Common signs of a damaged washer include:
- A faucet that continues dripping after being turned off
- Dripping that becomes worse when the handle is tightened
- Visible wear or damage when the faucet is disassembled
Replacing the washer with the correct size and type may resolve the leak.
2.2 Damaged O-Ring
An O-ring is a small rubber or elastomer seal used to prevent water from escaping around moving or connected faucet components. Over time, an O-ring can become brittle, stretched, cracked, or flattened.
A damaged O-ring may cause water to leak around the handle, faucet base, or another moving component. If the faucet’s internal parts are otherwise in good condition, replacing the O-ring may be sufficient.
2.3 Faulty Cartridge
A cartridge controls the flow and, in many faucet designs, the temperature of the water. Cartridge faucets can develop leaks when the cartridge becomes worn, damaged, or clogged with mineral deposits.
Common symptoms include:
- Dripping from the spout when the faucet is off
- Water leaking around the handle
- Difficulty controlling water temperature
- A handle that feels unusually stiff or loose
- Inconsistent water flow
If cleaning does not resolve the problem, the cartridge may need to be replaced with a compatible model.
2.4 Damaged Valve Seat
The valve seat forms part of the sealing area between the faucet components. Corrosion, mineral buildup, or prolonged wear can prevent the components from sealing properly.
A damaged valve seat may contribute to persistent dripping or leakage around the spout. Depending on the faucet design and extent of the damage, the seat may need cleaning, repair, or replacement.
2.5 Loose Faucet Components
Loose handles, connections, nuts, or fittings can allow water to escape from areas that should remain sealed.
A loose handle may make the faucet difficult to operate and can contribute to leakage around the handle. Loose connections beneath the sink can also cause water to leak around the supply lines or faucet mounting area.
Tighten accessible components carefully, but avoid overtightening, which can damage threads, seals, or faucet parts.
2.6 Mineral Buildup
Hard water contains dissolved minerals that can gradually accumulate inside and around faucet components. Mineral deposits may restrict water flow, interfere with seals, and prevent moving parts from operating smoothly.
Visible white, chalky, or crusty deposits around the faucet can indicate mineral buildup. Cleaning accessible components may restore normal operation, but heavily damaged or corroded parts may need replacement.
If mineral buildup has caused significant corrosion or the faucet continues to leak after basic repairs, replacing the affected component—or the entire faucet—may be more practical.
Types of Faucet Leaks
The location of a faucet leak can provide useful clues about its cause. Water may escape from the spout, handle, faucet base, or connections beneath the sink. Identifying where the water first appears can help narrow down which component needs inspection.
Leak From the Spout
A leak from the spout usually appears as water dripping from the faucet outlet even when the faucet is turned off.
Common causes include:
- Worn washers
- Faulty cartridges
- Damaged seals
- Mineral buildup
- Worn valve components
The appropriate repair depends on the faucet design and the component responsible for controlling the water flow.
Leak Around the Handle
Water appearing around or beneath the faucet handle may indicate a worn O-ring, damaged cartridge, loose component, or deteriorated seal.
This type of leak can sometimes become more noticeable when the handle is moved. Disassembling the faucet may be necessary to inspect the internal sealing components.
Leak From the Faucet Base
A leak around the base occurs where the faucet body meets the sink or countertop. Water may collect around the base and eventually run underneath the sink.
Possible causes include:
- Worn seals
- Damaged O-rings
- Loose mounting components
- Mineral buildup
- Corrosion
Cleaning the area and observing where fresh water first appears can help distinguish a base leak from water that is simply running down from the handle or spout.
Leak Underneath the Sink
Water underneath the sink is often associated with supply lines, shutoff valves, faucet connections, or other plumbing fittings rather than the faucet spout itself.
Check for moisture around:
- Hot- and cold-water supply lines
- Shutoff valves
- Connections beneath the faucet
- Fittings and seals
Place a container underneath the affected area before disconnecting any plumbing because residual water may spill out.
Difference Between Each Type of Leak
The location of the water is an important diagnostic clue:
- Spout leak: Often associated with internal washers, cartridges, or valve components.
- Handle leak: Often points to an O-ring, cartridge, seal, or loose component.
- Base leak: May involve seals, mounting components, corrosion, or mineral buildup.
- Under-sink leak: More commonly involves supply lines, shutoff valves, fittings, or connections.
If the leak source is unclear, the faucet is heavily corroded, or water is entering the cabinet or surrounding structure, professional plumbing assistance may be approp
Tools and Materials Needed
Before repairing a leaking faucet, gather the appropriate tools and replacement components. The exact items you need will depend on the faucet type and the source of the leak.
- Adjustable wrench: Useful for loosening and tightening nuts and faucet connections.
- Screwdriver: A flat-head or Phillips screwdriver may be needed to remove handles or access screws.
- Allen key: Some faucet handles are secured with a small hex-head screw that requires an Allen key.
- Replacement washer: Needed for faucets that use washers to create a watertight seal.
- O-ring: A compatible O-ring may be required when the original seal is worn, cracked, or flattened.
- Cartridge: Cartridge-style faucets may require a replacement cartridge if the existing one is damaged or worn.
- Plumber’s cloth: Useful for wiping components, protecting faucet finishes, and cleaning around connections.
- Bucket: Place it underneath the sink to catch residual water when disconnecting plumbing.
- Cleaning brush: Helpful for removing mineral deposits and debris from accessible faucet components.
- Compatible replacement seals: Different faucets use different seals, gaskets, and sealing components, so select replacements that match the specific faucet model.
Before purchasing replacement parts, identify the faucet’s make and model when possible. Using the wrong washer, O-ring, cartridge, or seal can prevent the faucet from sealing correctly and may create additional leaks.
How to Repair a Leaking Faucet: Step-by-Step
Repairing a leaking faucet often involves replacing a worn seal, washer, O-ring, or cartridge. The exact procedure depends on the faucet design, so identify the faucet type before removing internal components.
Step 1: Turn Off the Water Supply
Locate the hot- and cold-water shutoff valves beneath the sink and turn them off. If the fixture valves are unavailable or do not work properly, the home’s main water supply may need to be shut off.
Open the faucet briefly after shutting off the supply to release remaining water pressure. Place a bucket or towel underneath the connections to catch residual water.
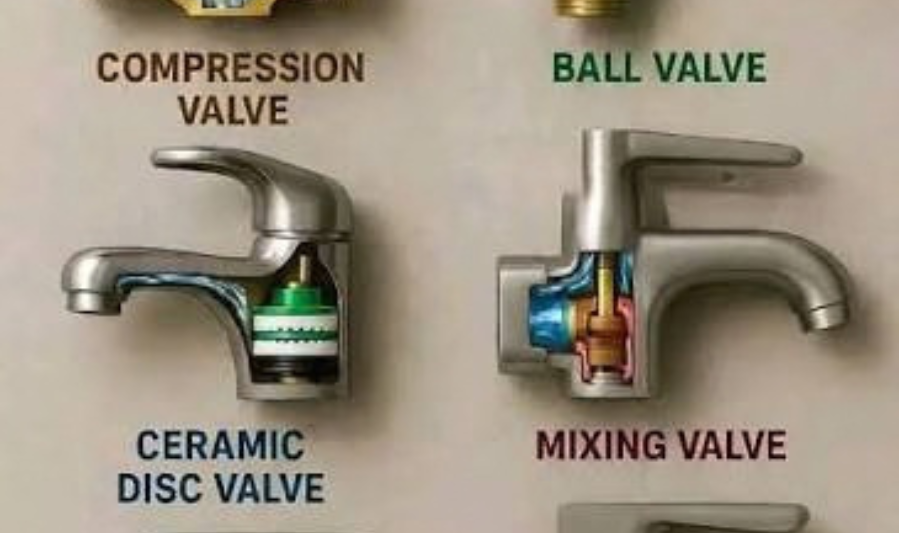
Step 2: Identify the Faucet Type
Determine which type of faucet you have before taking it apart:
- Compression faucet: Typically uses separate hot and cold handles and a washer to create the seal.
- Ball faucet: Uses a ball mechanism and several seals or springs inside the faucet body.
- Cartridge faucet: Uses a removable cartridge to control water flow and temperature.
- Ceramic-disc faucet: Uses ceramic discs and sealing components to regulate water flow.
The faucet type determines which components you should inspect and replace.
Step 3: Remove the Faucet Handle
Look for the screw securing the handle. It may be located beneath a decorative cap or on the side of the handle.
Remove the screw with the appropriate screwdriver or Allen key, then carefully lift the handle away. Avoid forcing it if it is stuck, as excessive force can damage the faucet.
Keep small screws and components in a safe place so they can be reinstalled in the correct order.
Step 4: Inspect Internal Components
With the handle removed, inspect the accessible internal components for signs of damage.
Look for:
- Cracked or hardened washers
- Worn or flattened O-rings
- Damaged cartridges
- Corrosion
- Mineral deposits
- Deteriorated seals
If the faucet has severe corrosion or damaged components that cannot be safely removed, professional repair may be more appropriate.
Step 5: Replace the Damaged Part
Choose a replacement component that is compatible with the faucet’s make, model, and design.
Remove the defective washer, O-ring, cartridge, or seal and install the replacement in the correct position. Follow the manufacturer’s instructions where available, particularly for cartridge and ceramic-disc faucets.
Do not force a component into place. An incorrectly sized or improperly installed part can cause continued leakage or damage the faucet.
Step 6: Clean Mineral Deposits
If mineral deposits are present, carefully clean accessible components using an appropriate method for the faucet material.
A soft cleaning brush or cloth can help remove loose buildup. Avoid scratching delicate surfaces or using cleaning products that are incompatible with the faucet’s finish or components.
Heavily corroded parts may need to be replaced rather than cleaned.
Step 7: Reassemble the Faucet
Put the components back in the correct order and reinstall the handle.
Tighten screws and connections securely, but avoid overtightening. Excessive force can damage threads, seals, or faucet components.
Before restoring the water supply, make sure all parts are properly seated and any removed connections are secure.
Step 8: Test the Faucet
Turn the water supply back on slowly. Watch the faucet and the connections underneath the sink as water pressure is restored.
Open and close the faucet several times and check for:
- Continued dripping from the spout
- Water around the handle
- Leaks around the faucet base
- Leaks underneath the sink
- Unusual water flow
If the faucet remains watertight, the repair is complete. If it continues to leak, recheck the installation and replacement part. Persistent leaks, severe corrosion, damaged shutoff valves, or complicated faucet designs may require professional plumbing assistance.
How to Repair Different Types of Leaking Faucets
Different faucet designs use different internal mechanisms, so the repair process depends on the type of faucet and the location of the leak. Before disassembling any faucet, shut off the water supply and keep track of the order in which components are removed.
6.1 Compression Faucet
Compression faucets typically have separate hot and cold handles and use a washer to create a seal when the faucet is closed.
Common causes of leaks include:
- Worn or damaged washers
- Damaged O-rings
- Corroded valve seats
- Loose components
- Mineral buildup
Basic repair process:
- Turn off the water supply.
- Remove the handle and expose the valve assembly.
- Remove the valve or stem assembly as appropriate for the faucet.
- Inspect the washer, screw, O-ring, and valve seat.
- Replace worn components with compatible parts.
- Clean away suitable mineral buildup.
- Reassemble the faucet and restore the water supply slowly.
- Check for continued dripping or leakage.
A worn washer is a common reason for a compression faucet to drip from the spout.
6.2 Cartridge Faucet
Cartridge faucets use an internal cartridge to regulate water flow and temperature. A worn or damaged cartridge can allow water to leak even when the faucet is turned off.
Signs of cartridge failure may include:
- Persistent dripping from the spout
- Water leaking around the handle
- Difficulty operating the handle
- Inconsistent temperature control
- Reduced or irregular water flow
Cartridge replacement generally involves:
- Shut off the water supply.
- Remove the handle and retaining components.
- Carefully remove the old cartridge.
- Inspect the cartridge housing for debris or damage.
- Install the correct replacement cartridge in the proper orientation.
- Reassemble the faucet.
- Restore water slowly and test the faucet.
Cartridges can vary significantly between models, so use a replacement specifically compatible with the faucet.
6.3 Ball Faucet
Ball faucets use a rounded internal ball mechanism along with springs, rubber seals, and other components to control water flow and temperature.
Common internal components include:
- Ball assembly
- Rubber inlet seals
- Springs
- O-rings
- Retaining components
Leaks can develop when seals or springs become worn, the ball is damaged, or mineral deposits interfere with the mechanism.
Repair considerations:
Turn off the water and remove the handle to access the internal assembly. Inspect the ball, seals, springs, and O-rings for wear or damage. Depending on the faucet model, a repair kit may allow the worn components to be replaced without replacing the entire faucet.
If the ball surface or faucet body is significantly damaged or corroded, replacing the faucet may be more practical.
6.4 Ceramic-Disc Faucet
Ceramic-disc faucets use two closely fitted ceramic discs to control water flow. They are generally durable, but leaks can still occur because of worn seals, damaged discs, mineral deposits, or problems with other internal components.
Common causes of leaks include:
- Damaged seals
- Mineral buildup
- Worn internal components
- Cracked or damaged ceramic discs
- Corrosion or damage to the cartridge assembly
Some minor buildup can be carefully cleaned, but ceramic components can be sensitive to damage. Follow the manufacturer’s repair instructions when available.
If the ceramic discs or cartridge assembly are cracked or severely damaged, the appropriate component may need to be replaced. If the faucet body itself is heavily corroded or replacement parts are unavailable, replacing the entire faucet may be the more practical solution.
For any faucet type, persistent leakage after component replacement may indicate an incorrect part, improper installation, corrosion, or damage elsewhere in the fixture. In such cases, professional diagnosis can help identify the underlying problem.
You may also like to read these posts:
Common Plumbing Problems at Home: Causes, Solutions & Prevention Tips
Water Leaking From Pipes: Causes, Warning Signs & How to Fix It
Low Water Pressure Problems: Causes, Solutions & Prevention Tips
Clogged Drain Problems: Common Causes, Easy Fixes & Prevention Tips
How to Repair a Faucet Leaking Around the Handle
Water leaking around a faucet handle often indicates a worn seal, damaged O-ring, faulty cartridge, or loose component. Because the exact cause depends on the faucet design, inspect the accessible components carefully before replacing parts.
Check O-Rings and Seals
O-rings and other seals help prevent water from escaping around moving faucet components. Over time, they can become cracked, flattened, brittle, or stretched.
After shutting off the water supply, remove the handle as appropriate for the faucet and inspect the accessible seals. Replace any damaged O-ring or seal with a compatible replacement.
Inspect the Cartridge
In a cartridge-style faucet, a worn or damaged cartridge can allow water to escape around the handle.
Look for signs such as:
- Persistent leakage around the handle
- Difficulty moving the handle
- Inconsistent water temperature
- Irregular water flow
If the cartridge is worn or damaged, replace it with a compatible model according to the manufacturer’s instructions.
Check for Loose Components
Loose handle screws, retaining nuts, or other components can prevent the faucet from sealing correctly. Check accessible fasteners and tighten them carefully.
Avoid overtightening, as excessive force can damage threads, seals, or the faucet body.
Replace Worn Parts
If inspection reveals a damaged O-ring, seal, cartridge, washer, or other replaceable component, install the correct replacement part.
After reassembly, turn the water supply on slowly and operate the faucet several times. Check around the handle and underneath the sink for any continuing leakage.
If the leak persists despite replacing the appropriate components, the faucet may have internal corrosion, a damaged valve assembly, or another underlying problem. Professional repair or complete faucet replacement may then be necessary.
How to Repair a Faucet Leaking at the Base
A faucet leaking around its base can allow water to collect on the countertop or sink surface and eventually reach the cabinet underneath. The leak may come from worn seals, loose mounting components, mineral buildup, or corrosion.
Inspect the Mounting Area
First, dry the area around the faucet base completely. Turn the faucet on and observe where fresh water first appears.
Check whether the faucet moves or wobbles when the handle is operated. A loose mounting assembly can allow water to reach areas that should remain sealed.
If accessible, inspect the mounting hardware beneath the sink and tighten it carefully according to the faucet manufacturer’s instructions. Avoid overtightening.
Check Seals and Connections
Worn or damaged seals and O-rings can allow water to escape around the base of the faucet.
After shutting off the water supply, inspect accessible seals and connections for:
- Cracks or deterioration
- Flattened or damaged O-rings
- Loose connections
- Water or mineral deposits around joints
Replace damaged seals or other compatible components as necessary. If water is coming from a supply connection beneath the sink rather than the faucet base itself, the supply line or fitting may be the actual source.
Look for Corrosion or Mineral Buildup
White, chalky deposits can indicate mineral buildup, while discoloration, pitting, or deteriorated metal may indicate corrosion.
Carefully clean accessible mineral deposits without damaging the faucet’s finish or sealing surfaces. If corrosion has significantly damaged the faucet body, mounting area, or connections, cleaning may not provide a lasting solution.
In cases of severe corrosion, recurring leaks, or damage that prevents the faucet from sealing properly, replacing the affected component or the entire faucet may be necessary.
How to Stop a Faucet From Leaking Temporarily
If you cannot repair a leaking faucet immediately, a few temporary steps can help control water loss and reduce the risk of damage. These measures are intended only as short-term solutions.
Turn Off the Affected Water Supply
Locate the hot- and cold-water shutoff valves beneath the sink and turn off the supply to the faucet. If the fixture shutoff valves do not work or cannot be safely operated, the home’s main water supply may need to be turned off.
Open the faucet briefly after shutting off the supply to release residual pressure and drain remaining water.
Reduce Water Waste
If the leak is minor and the faucet must remain available, use it only when necessary and avoid leaving it running or dripping unnecessarily.
Place a container beneath an accessible leak to collect water and protect the cabinet or surrounding surface. Empty the container regularly to prevent overflow.
For leaks from supply connections or other pressurized plumbing, shutting off the affected water supply is preferable to relying on a temporary collection method.
Temporary Solutions Should Not Replace Permanent Repairs
Turning off the water or containing a small leak can help prevent immediate water waste, but these measures do not correct the underlying problem. A worn washer, damaged O-ring, faulty cartridge, corroded component, or loose connection will continue to require attention.
Arrange a proper repair as soon as practical. If the leak is severe, involves a damaged shutoff valve, or continues after the water supply has been turned off, professional plumbing assistance may be necessary.
FAQS:
How do I repair a leaking faucet at home?
Turn off the water supply, identify the source of the leak, and inspect parts such as the washer, O-ring, cartridge, or seals. Replace the damaged component with a compatible part and test the faucet.
Why does my faucet keep dripping after I turn it off?
A worn washer, damaged cartridge, faulty seal, or mineral buildup may prevent the faucet from closing properly. Replacing the affected component can often stop the dripping.
Can I repair a leaking faucet without replacing it?
Yes, many faucet leaks can be repaired by replacing individual parts such as washers, O-rings, cartridges, or seals. However, a severely damaged or corroded faucet may need replacement.
How do I stop a faucet from leaking around the handle?
Turn off the water supply and inspect the handle area for a damaged O-ring, cartridge, seal, or loose component. Replacing the worn part may resolve the leak.
When should I call a plumber for a leaking faucet?
Contact a plumber if the leak continues after repair, the faucet is severely damaged or corroded, the shutoff valve is faulty, or you cannot safely identify and fix the source of the leak.
Conclusion
Knowing how to repair a leaking faucet can help prevent water waste, higher utility bills, and potential plumbing damage. Start by turning off the water supply, identifying the leak, and checking components such as washers, O-rings, cartridges, and seals. Replacing worn parts can often solve minor leaks, while severely damaged or persistent problems may require professional plumbing assistance.